
Elite LiteSpeed cache configuration for fastest load time (2022)
What is caching and why you should use it?
Caching is the process of saving pages and posts of the website statically to reduce database and PHP load of the server.
Whatever version of PHP (7 or 8) and any type of database engine ( MySQL, MariaDB, PostgreSQL or etc…) you are using, you need to serve static html pages to your website’s visitors to get the most of your hardware resources especially CPU and RAM.
Both visitors and search engines love fast websites and no one likes to wait several seconds to load a single page. So caching is an important and initial step to boost Search Engine Optimization (SEO) of any website.
In order to load a page or a post, a server must run multiple tasks which includes header, footer, sidebar, media and other content of the post.
All these processes could be done in a matter of milliseconds. If a website has a very few visitors that’s not a big deal for a server but as soon as the number of visitors increases all those milliseconds add up and as any server has limited resources, that would be wise to somehow reduce the loads as much as possible.
Caching comes to the game here by doing all those steps one time for the first visit and serving a static page to all the following visits.
There are some legitimate caching plugins available for WordPress including WP Rocket, WP Super Cache,W3 Total Cache, WP fastest cache, Hyper cache and etc.
LiteSpeed cache is one of the best plugins available in the market. It is the most comprehensive plugin used for speeding up any WordPress website. It has been ranked number 1 in various tests done even by developers of other caching plugins. It’s so popular that it has earned a nickname too called LSCache.
What are requirements to run LiteSpeed cache?
LSCache has multiple functions. Some of them are general but it has exclusive features as well.
General features of LiteSpeed cache are available to any website using any type of server including LiteSpeed, Apache, NGINX, etc.
Exclusive features of Litespeed are meant to be used in any host including LiteSpeed-powered hosting , QUIC.cloud CDN , OpenLiteSpeed or commercial LiteSpeed products.
Is using LiteSpeed cache always the best possible solution?
The quick response to this question is both yes and no. It depends on the server which is supposed to host the WordPress website.
If the server doesn’t have one of the features mentioned in the previous section, It can only use general features of LiteSpeed. For these servers there are better options like WP Rocket.
Servers that support all features of LSCache can use LiteSpeed to the fullest because it outperforms any other caching plugins.
How LiteSpeed can speed up the website?
LiteSpeed cache has multiple functions and works in harmony with almost all other plugins and themes.
“General” features of LSCache
Here are a few “General” features of LSCache any site can benefit from regardless of server features:
- Object Cache (Memcached/LSMCD/Redis) Support
- Minify CSS, JavaScript, and HTML
- Minify inline & external CSS/JS
- Combine CSS/JS
- Automatically generate Critical CSS
- Image Optimization (Lossless/Lossy)
- Multiple CDN Support including Free QUIC.cloud CDN Cache
“Exclusive” Features of LiteSpeed cache
- Fully automated page caching
- Fully automated purging based on events like adding a new post, updating a previously written post.
- Separate caching of desktop and mobile views
- WooCommerce and bbPress support
- Excluding certain tags or categories from caching
LiteSpeed cache Installation
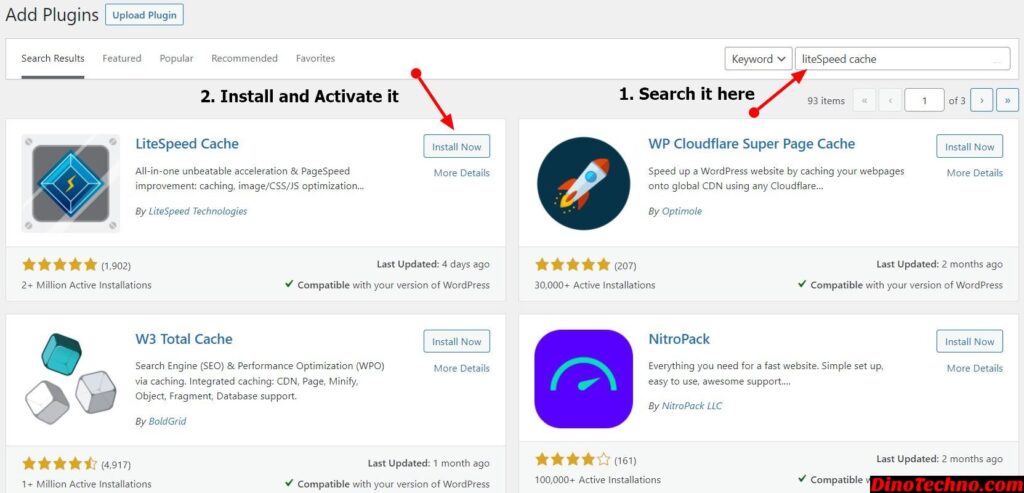
- Go to admin panel of your WordPress website and in the left column navigation hover mouse on Plugins and click on Add New.
- Search for LiteSpeed Cache in the search box.
- Click on Install Now and after successful installation, click on Activate.
After activation, LiteSpeed is disabled by default and you could go to the left navigation menu, on LiteSpeed Cache, click on Cache and change Enable Cache to ON.
You could stop here and still get a lot of benefits from LSCache but if you want more detailed setup steps and want to get the maximum out of LiteSpeed, follow this article to the end. Our goal is to explain the best features to enable/disable in a time-saving way.
LiteSpeed Cache Menu features
LiteSpeed cache menu is simple at the first look and it consists of several parts including
- Dashboard
- General
- Cache
- CDN
- Image Optimization
- Page Optimization
- Database
- Crawler
- Toolbox
In this article you will learn all the items and possibilities of each of them thoroughly to get the most of LSCache plugin.
LiteSpeed Dashboard
Dashboard section has statistics about QUIC.cloud Service Usage. It could be something like the picture below. (It could be different as it reflects statistics.)
There is nothing in this section to configure. You can leave and look at this section after you have completely configured your LiteSpeed cache.
General
General Settings
Automatically Upgrade: It is preferred to be ON. However it has nothing to do with your website’s speed and you could always upgrade liteSpeed plugin manually.
Domain Key: If you want to get benefits from QUIC.cloud click on Request Domain Key. (Recommended for most users).
Guest Mode: When guest mode is turned on, LiteSpeed cache doesn’t try to identify the first-time visitor and shows them the cached static page and it significantly speeds up load-time of your pages by eliminating time to process visitors, cookies and cache variables. The eliminated processes are being summoned by Ajax.
Serving time of static pages versus Ajax could be different and it could cause some visual display issues. So it would be suggested to test and try this option only when you have found your website works totally fine with this option enabled.
Guest Optimization: Enabling this option alongside with Guest mode, leads to a maximum level of optimization and makes the score of websites on services like GTMetrix and Google PageSpeed very high but there are some considerations to keep on mind:
- Each stylistic variant for every page will be given its own CSS file and the number of hosted items on your website will be increased significantly and each of these files are equal to 1 INODE from your available INODEs. on the other hand it uses your available quota in Quic.cloud.
- Disk I/O will be used rapidly especially due to the traffic from crawlers.
Considering everything, it would be suggested to keep Guest Optimization to OFF for most users.
Server IP: Enabling this option allows cloud services to call IP instead of domains. It has a small effect on your website speed but the common recommendation for most users would be Not USING this option.
Notifications: This item keeps you updated with LiteSpeed cache notifications and actually doesn’t have anything to do with the caching process and it’s totally optional.
Tunning
Tunning: You don’t need to change anything on this section unless you have enabled enabled Guest Mode or want to make some changes.
With this option enabled all listed bots and IPs will be served a cached page. This option should be enabled only for IPs and visitors that don’t need any personalized content.
Cache
Cache is the most important and confusing part of LiteSpeed cache plugin. It has numerous subsections. However, we have gathered all the best configurations listed below.
Cache
Cache Control Settings
Enable Cache: MUST be turned on to enable LiteSpeed cache.
Cache Logged-in Users: Only care about this option if you have a lot of registered members at your website. If you prefer to give logged-in users a different page, turn this option to OFF. But if your members don’t need to be served a dynamic page, turn this option ON to reduce server load.
Cache Commenters: if commenting on your website is enabled and you get a lot of comments, leave this item to ON.
Cache REST API: it caches requests made by WordPress REST API calls and leave it to ON.
Cache Login Page: if registration is enabled on your website, set it to ON for best performance.
Cache favicon.ico: It is recommended to keep this item to ON to reduce probable PHP calls.
Cache PHP Resources: Leave it to ON to reduce PHP calls.
Cache Mobile: If your theme works without any problem for mobile devices, set this option to ON. (Experiments should be done.)
List of Mobile User Agent, Private Cached URIs, Force Cache URIs Force Public Cache URIs and Drop Query String could be let as default unless you have special needs.
TTL
TTL is the abbreviation for ‘Time to Live’ in LiteSpeed cache and it consists of two main parts.
Default (Public, Private, Front page, Feed, REST) TTL: These are the intervals in seconds to regenerate a new page. Numbers are in seconds and should be more than 30. Considering purging cached pages anytime a post is being submitted or updated, you could leave these values. If your front page is being updated frequently, choose a less number for its value.
Default HTTP Status Code Page TTL: Although LiteSpeed cache offers 3 status codes by default, you can specify other status codes for your website. The common HTTP status codes are as below:
- 400 Bad Request
- 401 Unauthorized (RFC 7235)
- 402 Payment Required
- 403 Forbidden
- 404 Not Found
- 405 Method Not Allowed
- 406 Not Acceptable
- 429 Too Many Requests
- 500 Internal Server Error
- 502 Bad Gateway
- 503 Service Unavailable
- 504 Gateway Timeout
You can set as much as time you prefer for these requests. For example, your website faces many 404 errors, setting a lower value would be wise and if your web hosting provider limits your maximum resource usage, setting a lower value for 500 status code is suggested.
Purge
Purge All On Upgrade: leave it to ON so that your website reflects latest changes to the visitors.
Auto Purge Rules For Publish/Update: It shows pages that will be automatically purged when posts are published/updated. The default values are good but you can add/remove items according to your needs.
Serve Stale: If your server can handle your visitors while the pages are being purged and can serve visitors dynamic pages without any problem, leave this value to OFF.
Scheduled Purge URLs and Scheduled Purge Time: These two items work together to set specific time for purging your desired pages. Add one URL per line in Scheduled Purge URLs box and then specify scheduled purge time in the next section.
Purge All Hooks: This box has a list of certain WordPress hooks that running them will purge ALL cached pages.
Exclude Settings
This part includes a comprehensive list of all parts that LiteSpeed cache will exclude from caching.
You can set URLs, Query Strings, Categories, Tags, Cookies and User Agents to be excluded from LiteSpeed cache.
One other interesting feature of LiteSpeed cache is to disable caching based on user roles. If administrator always needs to see dynamic (not cached) page, turn on the check box on the left side of this role.
If you always want all registered members to see dynamic pages, turn on the check box on the left side of the subscriber role.
ESI Settings
With ESI (Edge Side Includes), pages may be served from cache for logged-in users. The default values seem to work perfectly for most webmasters.
Object Cache Settings
Object Cache: This item is off by default and it’s recommended that you keep it OFF.
Method: If you have enabled the previous item, choosing Method option is effective . By default this is set to Memcached. If your object cache is Memcached or LSMCD, set Method to Memcached. Otherwise it should be Redis.
Rest of the items do not need any other changes for most webmasters.
Browser Cache Settings
Browser Cache: By enabling this item the logo and content are stored locally on the visitors’ device in the first visit. Sometimes enabling it means that visitors need to refresh the page to see the updated version.
Disabling /enabling this item is optional but enabling causes hardware resources to be kept enormously low by reducing repeated requests for static files.
The default value is 31557600 seconds which is equal to 1 year.
Advanced Settings
Login Cookie: Only use this if you have multiple WordPress installed on your domain. (Not required in most cases)
Improve HTTP/HTTPS Compatibility: Only enable this option if you use both HTTP and HTTPS in the same domain. (Not required in most cases)
Instant Click: Enabling this option preloads every page a visitor hovers mouse over and it increases the server load. The recommended setting would be OFF.
CDN
CDN Settings
QUIC.cloud CDN: It is recommended to toggle this option to ON.
Use CDN Mapping: The preferred setting would be OFF if you have enabled QUIC.cloud CDN or any other CDN. Otherwise your website won’t work well.
CDN URL: the preferred value to put in the text box would be like https://cdn.yourdomain.com/
HTML Attribute To Replace: Nothing it required to change here for most users.
Original URLs: A good value to put here is like //yourdomain.com/
Included Directories and Exclude Path : the default values seem good and no changes are needed.
Cloudflare API: First you should sign up for Cloudflare and generate an API; then you can add it to this section.
Manage
Everything in this section is OK and most users don’t need to make any changes here.
LiteSpeed Cache Image Optimization
Image Optimization Settings
Auto Request Cron: Turn this option ON to automatically send image optimization requests via Cron job for new media library uploads.
Auto Pull Cron: Turn ON this value to fetch newly-optimized images automatically.
Optimize Original Images: The recommended value is ON to optimize JPG and PNG images. A backup will be saved too.
Remove Original Backups: The recommendation would be OFF as it’s irreversible.
Optimize Losslessly: It is a tradeoff between having better quality images and compact images. If you need images with a better quality, definitely turn this option ON.
Preserve EXIF/XMP data: When this option in ON, image’s EXIF or XMP data like camera equipment type, copyright date and photographer, GPS coordinates, comments, keywords and etc. would be kept. It obviously increases image size.
Create WebP Versions: The default value is fine. It also means in the process of image optimization also a .WEBP version of the file is generated. If you want to enable Image WebP Replacement in the next step, enable it.
Image WebP Replacement: If you have a lot of images and need a fast-paced load of pages, enable this option. Otherwise, you could leave this value to OFF.
WebP Attribute To Replace: Remove an attribute from the list if you do not want WebP images replaced there. Add a new one to the list if you would like.
WebP For Extra srcset: If you have a custom code on your site, and it adds srcset elements and at the same time it bypasses WordPress logic to do so, turn this ON. Otherwise leave this value to OFF. (Turning ON is not recommended for most users.)
WordPress Image Quality Control: You can put any number below 100 in this field. Lower values return more compression ratio and lower image qualities.
Page Optimization
There are many changeable values in this section and the recommended values will be expressed without additional explanations to save your time. Please keep in mind that different websites might experience different optimizations changing these fields. The following recommendations are general and can be applied to most users without facing any issues on the performance and appearance of their websites.
CSS Settings
| CSS Minify | ON |
| CSS Combine | ON |
| Generate UCSS | ON |
| UCSS Inline | OFF |
| CSS Combine External and Inline | OFF |
| Load CSS Asynchronously | OFF |
| CCSS Per URL | OFF |
| Inline CSS Async Lib | ON |
| Font Display Optimization | Default |
JS Settings
| JS Minify | ON |
| JS Combine | OFF |
| JS Combine External and Inline | ON |
| Load JS Deferred | ON |
HTML Settings
| HTML Minify | ON |
| DNS Prefetch | Leave Empty |
| DNS Prefetch Control | ON |
| HTML Lazy Load Selectors | Leave Empty |
| Remove Query Strings | OFF |
| Load Google Fonts Asynchronously | OFF |
| Remove Google Fonts | OFF |
| Remove WordPress Emoji | OFF |
| Remove Noscript Tags | OFF |
Media Settings
| Lazy Load Images | ON |
| Basic Image Placeholder | Leave |
| Responsive Placeholder | OFF |
| Responsive Placeholder SVG | Leave |
| Responsive Placeholder Color | Leave |
| LQIP Cloud Generator | OFF |
| LQIP Quality | Leave |
| LQIP Minimum Dimensions | Leave |
| Generate LQIP In Background | ON |
| Lazy Load Iframes | ON |
| Add Missing Sizes | OFF |
Media Excludes
All items of this section could be left to default values.
Localization Settings
| Gravatar Cache | OFF |
| Gravatar Cache Cron | OFF |
| Gravatar Cache TTL | Default value seems OK |
Tuning Settings
All items of this section could be left to default values.
LiteSpeed Cache Database Optimization
In addition to page, CSS, Image and other optimizations, LiteSpeed cache offers you a great deal of facility of Database optimization to enhance the performance of the website.
Clean All: Optimizes all functions listed on Database Optimizer page. (Performs all below optimizations by one click.)
Post Revisions: deletes all revisions of your posts.
Auto Drafts: deletes all auto-saved drafts.
Trashed posts: All trashed posts and pages will be deleted using this.
Spam Comments: if you want to delete all spam marked comments from your website, this item is the way to go.
Trashed Comments: All comments you previously deleted and moved to trash would be deleted by clicking on this item.
Trackpacks/Pingbacks: It deletes all trackbacks and pingbacks.
Expired Transients: It removes all transient options from your WordPress site.
All transients: delete all transients.
Optimize Tables: Depending on the update frequency of contents on your website, you could use this option to optimize tables in the database. You could use this option every week or so according to the number of posts you submit.
LiteSpeed Cache Crawler
The only settings you probably need to look for in this section are Crawler General Settings and Sitemap Settings. First of all, you probably ask yourself why would I need to turn on Crawler?
The difference between turning on/off is that if you turn off crawler, the process of making a static cached page is triggered user’s demand. If a user hits a certain page on your site, LiteSpeed cache will make a static file for that page. But if you want to have static pages premade regardless of visitors’ demand, turn ON cache crawler.
General Settings
Delay: the interval between crawling and making cached pages could be set here. It is recommended to set this value according to the hardware resources you have and the speed your website can handle. If you run your WordPress website/weblog on a dedicated server, lower numbers will not cause any issue, but for shared hosted websites higher numbers would be more reasonable. The maximum number you can set is 30,000 which is equal 0.3 seconds.
Run Duration: It shows how long you want the crawler to run each time. The default value is 400 seconds (which is good enough). Please keep in mind that you don’t need to worry about the missed pages that the crawler didn’t have time to crawl at the first run because it automatically starts from the last point it crawled.
Interval Between Runs: Depending on the load on your website, set this value. It shows the resting time for crawler between two consecutive crawling.
Crawl Interval: This item specifies how long in seconds the crawler should be crawling the entire sitemap again.
Threads: The number of concurrent crawler which work together at the same time to crawl your pages. Higher value leads to faster crawling speed but it puts more pressure on the server.
Timeout: It is the maximum time for crawling each page. It highly depends on your server performance and if you are running your site on a low speed server, go for higher values (the maximum possible option is 300)
Server Load Limit: The number of in use crawler threads will be slowly reduced until average server load falls under this limit. Most webmasters don’t need to change the default value which is 1.
Sitemap Settings
Custom Sitemap: If your website has an XML sitemap it’s highly recommended to add it to this section. It makes the process of looking for new posts easier for LiteSpeed cache crawler. Making sitemap is possible using most popular SEO plugins including: All In One SEO Pack, Rank Math, Yoast SEO etc.
Drop Domain from Sitemap: if you don’t have multiple domains and you have addressed your XML sitemap in Custom Sitemap, turn this item to ON.
LiteSpeed Cache Toolbox
Some parts are already covered previously. It’s always good to have a look at possibilities of this submenu. And always keep in mind to not change parameters of this section unless you know what you are doing. One of the best features on LiteSpeed cache is the ability to make a backup of your preferred settings and import them whenever you need. To do this go to Import / Export.
Import / Export: to export set settings click on Export and to import a previously exported file, in import Settings, Choose file and then click on Import.
Reset All Settings: If you have done multiple changes and suddenly something went wrong with your website and you need to restore it to the previous working state, use this button to reset all settings to the default values. (You won’t need to use this option if you followed this tutorial.)