

How to Fully Clear Cache in Windows 11
Windows 11 caches various data in different parts and sections that an average user is not aware of. Most users can only clean cache of some parts of their Windows. If you clear cache of all parts of Windows, you will have a lighter Windows and more disk space on your Windows drive.
The main usage of cache is saving some data that are supposed to be used later to deliver them faster to the user but when the cache becomes so huge, the cache itself can reduce the performance of Windows.
There are various methods to clear cache of all parts of Windows 11 which will be explained in detail below.
Clear Cache of Windows 11
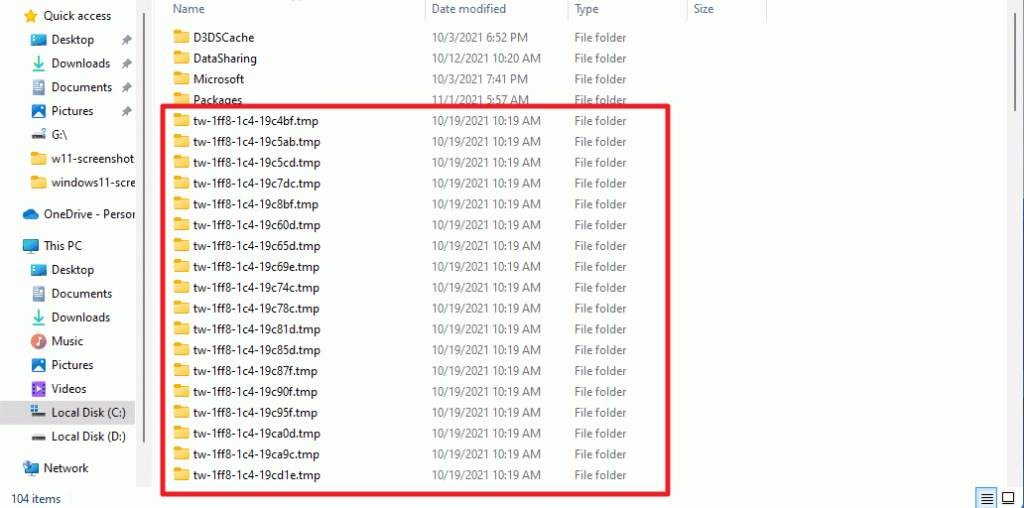
1. Temp Folder
The Temp folder is located in C:\Users\YourUserName\AppData\Local\Temp. Go there, select and remove all files and folders. Please keep in mind that you need to replace YourUserName with the username you have selected for your Windows.
You could get the Folder Access Denied message several times and you can click on Continue and you can also check Do this for all current items
It will be something similar to the following image.
2. Windows Temp Folder
To clean cache of Windows Temp folder, do the following steps:
- Press Win key + R to launch Run
- Type Temp and click on OK
- You will get a notification telling you that you need to press continue to get access to this folder. Press on the Continue button.
- Select all files and delete them.
Again you could get the Folder Access Denied message several times and you can click on Continue and you can also check Do this for all current items.
3. Clear Cache of Download Folder of Windows Updates
To delete download folder of Windows Updates files to as below:
- Copy and paste this location on Windows Explorer: C:\Windows\SoftwareDistribution\Download . If you have installed Windows on another driver, change the C with that one.
- Select file and folder and delete them.
4. Clear Cache of Windows Prefetch Folder
To delete all files and folders located in Windows Prefetch folder, do as below:
- Copy and paste this location on Windows Explorer: C:\Windows\Prefetch . If you have installed Windows on another driver, change the C with that one.
- You will get a notification telling you that you need to press continue to get access to this folder. Press on the Continue button.
- Select file and folder and delete them
5. Windows Disk Cleanup
This Windows built-in removing tool helps you get rid of many useless files and data located on your computer. Please note the files you are going to keep in this section. Follow these steps:
- Go to This Computer (or My Computer) and right click on drive C.
- Click on Properties -> Disk Cleanup
- You can select the following files to be deleted: Downloaded program files, temporary internet files, Windows error reports, DirectX shader cache, delivery optimization files, recycle bin, temporary files and thumbnails
- Click on OK to remove selected files.
To Cleanup system files, stay on the same Windows and just:
- Click on Clean up system files
- Select files you want to remove
- Click on OK
6. Clear Windows File Explorer History
To clean all history of windows file explorer, you just need to:
- Go to This Computer
- Go to View – > Options – > Change folder and search options
- On the General section, look at the Privacy at the bottom of the window.
- You will have the option to select : Show recently used files in quick access and show frequently used folders in quick access too.
- Click on Clear file Explorer History
7. Clear Cache of Windows Store
To clean cache of Windows Store, do the following steps:
- Press Win key + R to launch Run
- In the box, type: wsreset
- A command prompt window will open and after cleaning cache of Windows Store, the windows Store will open
8. Clear Cache of DNS Information
To flush DNS information from Windows 11 do as below:
- Press Win key + R to launch Run
- Type CMD
- Then type: ipconfig /flush
9. Clean Location History of Windows 11
To clean all location history of Windows 11 do as below:

- Right-Click on an empty space on desktop and choose Personalize
- Go to Privacy and Security -> Location
- Go down to see Location History, click on Clear
Please make sure to read this article to learn how to clear cache of browsers like Chrome, Safari, Brave, Firefox, Internet Explorer and Opera.